- Web hosting
- Services
- Help
Knowledge base
Installing Linux, Apache, MySQL, PHP (LAMP) Manually
Before installing the software, update the information in the repositories using the following command.
root@i:~# apt update - for OS Debian,

root@i:~# yum makecache - for OS CentOS
After the updates are completed, continue with the installation of the needed software.
Apache
OS Debian
Install Apache Prefork using the following command:
root@i:~# apt install apache2
Install Apache Worker using the command
root@i:~# apt install apache2-mpm-worker
For Apache ITK, use the following command:
root@i:~# apt install apache2-mpm-itk
OS CentOS
Install Apache Prefork using the following command:
root@i:~# yum install httpd
To update the version of Apache Worker, use the following command to stop the webserver:
systemctl stop httpd
Next, open /etc/sysconfig/httpd for editing and enable the HTTPD=/usr/sbin/httpd.worker line by removing the comment mark. If the following lines are not present in the file, add them:
<IfModule worker.c>

StartServers       6

MinSpareServers    6

MaxSpareServers   15

ServerLimit      156

MaxClients       156

MaxRequestsPerChild  3000

</IfModule>
These directive values should be set as necessary.
To update the version of Apache ITK, enable the HTTPD=/usr/sbin/httpd.itk line by removing the comment mark. If the following lines are not present in the file, add them:
<IfModule itk.c>

StartServers       6

MinSpareServers    6

MaxSpareServers   15

ServerLimit      156

MaxClients       156

MaxRequestsPerChild  3000

</IfModule>
These directive values should be set as necessary.
MySQL
OS Debian
To install a MySQL database server, use the following command:
root@i:~# apt install mysql-server mysql-client
During installation, you must enter the access password for the root user of the MySQL server. Use complex passwords that contain upper and lower case letters, numbers and special characters.
OS CentOS
To install a MySQL database server, use the following command:
root@i:~# yum install mariadb mariadb-server
When the installation is complete, start MySQL and add it to startup with the command:
root@i:~# systemctl start mysql && systemctl enable mysql
then change the password using the command:
root@i:~# /usr/bin/mysqladmin -u root password 'mynewpassword'
PHP
The following commands install the basic PHP extensions and a module for Apache.
OS Debian
Check which version of php is available for your operating system with the command:
apt show php
In our example, this is php 7.4:
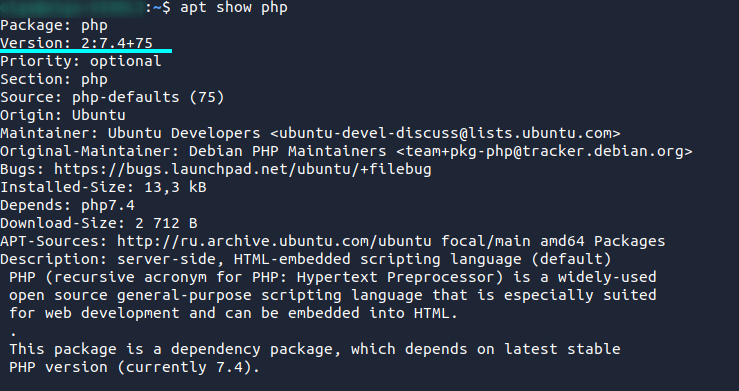
Install PHP by specifying your package version in the command:
root@i:~# apt install php7.4 php7.4-mysql
OS CentOS
To install PHP, run the command:
root@i:~# yum install php php-mysql
Site
OS Debian
For each added domain, create a separate configuration file and name it for the domain:
touch /etc/apache2/sites-enabled/mydomain.com

where “mydomain” is your domain name.
Open the configuration file to edit and add the following section:
<VirtualHost 1.0.0.1:80 >

       ServerName mydomain.com

       ServerAlias www.mydomain.com

       DocumentRoot /var/www/sites/mydomain.com

       CustomLog /var/www/httpd-logs/mydomain.com.access.log combined

       ErrorLog /var/www/httpd-logs/mydomain.com.error.log

       AddType application/x-httpd-php .php

</VirtualHost>

where 1.0.0.1 - is the server IP address and “mydomain.com” is your domain name.
Выполните перезагрузку веб-сервера
systemctl reload apache2
If the website’s operation requires a database (MySQL in this example), connect to the server:
mysql -u root -p
and create a database:
create database db;
Create a user that will have full access rights to the database:
grant all privileges on mydb.* to 'myuser'@'localhost' identified by 'mypassword';

where “mydb” is the database name, “myuser” is the user name, and “mypassword” is the password.
Create directories for the site:
mkdir /var/www/sites/

mkdir /var/www/sites/mydomain.com

chown -R www-data:www-data /var/www/sites/

mkdir /var/www/httpd-logs

touch /var/www/httpd-logs/mydomain.com.access.log

touch /var/www/httpd-logs/mydomain.com.error.log

chown -R www-data:www-data /var/www/httpd-logs
If necessary, install the desired CMS by going to the site directory…
cd /var/www/sites/mydomain.com
For CMS Joomla, download its installation package:
wget https://downloads.joomla.org/cms/joomla4/4-0-3/Joomla_4-0-3-Stable-Full_Package.zip
Unpack the .zip file using the command:
unzip Joomla_4.0.3-Stable-Full_Package.zip
With the correct DNS configuration, you will be able to access your site through a browser using its domain name; otherwise, you can use the IP-address.
OS CentOS
For each added domain, create a separate configuration file and name it for the domain.
touch /etc/httpd/sites-enabled/mydomain.com.conf

where “mydomain” is your domain name.
Open the configuration file to edit and add the following section:
<VirtualHost 1.0.0.1:80 >

       ServerName mydomain.com

       ServerAlias www.mydomain.com

       DocumentRoot /var/www/sites/mydomain.com

       CustomLog /var/www/httpd-logs/mydomain.com.access.log combined

       ErrorLog /var/www/httpd-logs/mydomain.com.error.log

       AddType application/x-httpd-php .php

</VirtualHost>

where 1.0.0.1 - is the server IP address and “mydomain.com” is your domain name.
Restart the web server
systemctl reload apache2
If the website’s operation requires a database (MySQL in this example), connect to the server:
mysql -u root -p
and create a database:
create database db;
Create a user that will have full access rights to the database:
grant all privileges on mydb.* to 'myuser'@'localhost' identified by 'mypassword';

where “mydb” is the database name, “myuser” is the user name, and “mypassword” is the password.
Create directories for the site:
mkdir /var/www/sites/

mkdir /var/www/sites/mydomain.com

chown -R apache:apache /var/www/sites/

mkdir /var/www/httpd-logs

touch /var/www/httpd-logs/mydomain.com.access.log

touch /var/www/httpd-logs/mydomain.com.error.log

chown -R apache:apache /var/www/httpd-logs
If necessary, set the desired CMS by going to the site directory…
cd /var/www/sites/mydomain.com
For CMS Joomla, download its installation package:
wget https://downloads.joomla.org/cms/joomla4/4-0-3/Joomla_4-0-3-Stable-Full_Package.zip
Unpack the .zip file using the command:
unzip Joomla_4.0.3-Stable-Full_Package.zip
With the correct DNS configuration, you will be able to access your site through a browser using its domain name; otherwise, you can use the IP-address.