- Web hosting
- Services
- Help
Knowledge base
Ordering an Additional IP-address for the Virtual Dedicated Server
It is advisable for a server to have an additional IP-address through which it can be accessed when the primary IP-address is not available. The additional IP-address is also used for Slave DNS setups, for providing individual IP-address to multiple websites located on the same server, and more.
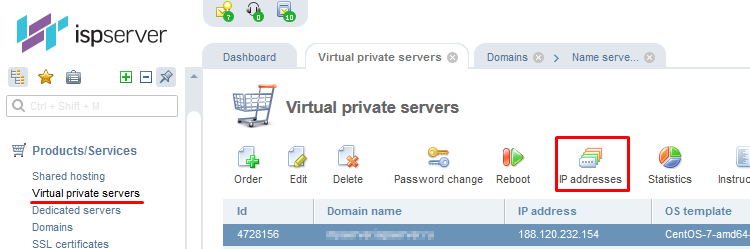
How to order an additional IP?
In your personal account, go to "Products/Services" — "Virtual Private Servers, ”select the server and click on "IP address" on the toolbar.
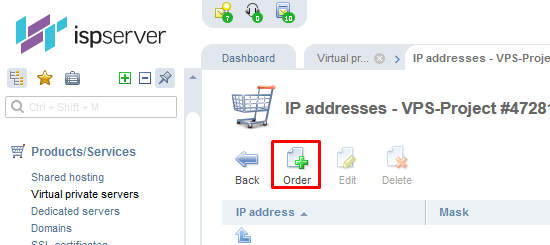
Click the "Order" button.
Select the IP-address protocol type, domain name and the number of required additional IP-addresses.
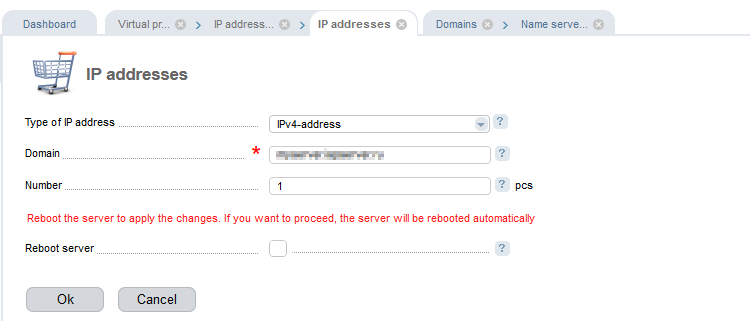
Toggle “Reboot server” and click OK for the changes to take effect. The server will then be rebooted.
Add IP
The IP-address should be added to the server once ordered.
ISPmanager
Enter the ISPmanager control panel, go to "Settings" — "IP addresses" and click "Add".

Enter the IP-address you want to add.

You must specify the subnet mask and gateway address; these parameters will be determined automatically, so leave them unchanged unless you have a specific need to change them.
The changes will take effect when you click the “OK” button; in this case, no reboot is necessary.
Manual Setup
Manual setup of a additional IP-address is required for servers with KVM virtualization without the ISPmanager control panel. Erroneous actions resulting from manual setup can disrupt network server access. In these cases, use the VNC to restore access.
If you do not know the network mask and gateway address, request them from our support team.
Debian/Ubuntu
In edit mode, open the /etc/network/interfaces file and add one of the following units to the end:
| Primary IPv4 |
iface eth0 inet static address 10.10.10.10 netmask 255.255.240.0 network 10.10.10.0 broadcast 10.10.10.255 gateway 10.10.10.1 dns-nameservers 178.130.147.3 |
| Additional IPv4 |
uto eth0:N iface eth0:N inet static address 10.10.10.11 netmask 255.255.240.0 N - serial number of additional IP: first substitute - 0 second - 1, etc. |
| Primary IPv6 |
iface eth0 inet6 static address 2a01:230:X:X::X gateway 2a01:230:X:X::1 netmask 64 |
| Additional IPv6 |
iface eth0:N inet6 static address 2a01:230:X:X::X N - serial number of additional IP: first substitute - 0 second - 1, etc. |
After making your changes, reboot the server. If added successfully, the IP addresses will appear on the network interface.
CentOS
Open the /etc/sysconfig/network-scripts/ifcfg-eth0:N file for editing. If it does not exist, create the file and add one of the following units to the end:
| Primary IPv4 |
DEVICE="eth0" BOOTPROTO="static" DNS1="178.130.247.2" GATEWAY="72.146.32.1" IPADDR="182.46.32.134" NETMASK="255.255.240.0" ONBOOT="yes" |
| Additional IPv4 |
DEVICE=eth0:N ONBOOT=yes BOOTPROTO=static IPADDR=XX.XX.XX.XX NETMASK=255.255.240.255 N - serial number of additional IP: first substitute - 0 second - 1, etc. |
| Primary IPv6 |
IPV6ADDR=2a01:230:X:X::X/64 IPV6_DEFAULTGW=2a01:230:X:X::1 IPV6INIT=yes |
| Additional IPv6 |
IPV6ADDR_SECONDARIES="2a01:230:X:X::X/64" N - serial number of additional IP: first substitute - 0 second - 1, etc. |
After making your changes, reboot the server. If added successfully, the IP-addresses will appear on the network interface.